GoPro Shortcuts – How To Add On-Screen (Hero 10 Black)
GoPro shortcuts were introduced with the advent of the Hero 8 Black. This simple yet powerful feature has now become a favourite amongst GoPro owners.
They are a great way to adjust your skiing settings, mountain biking settings for example super quickly as your taking part right in the middle of the action.
Discover how to get the best from the shortcuts on your GoPro camera by reading this article.
What Are Shortcuts
All of the 3 Modes on the later GoPro cameras have access to shortcuts. In essence a shortcut allows the user to access a particular setting directly from the Modes main screen.
In practice this means for example in Video Mode you can quickly alter the setting for Stabilization. Or perhaps change the white balance without having to enter the presets main menu settings.
As the name suggests this does save you the hassle of scrolling down through the main settings listed in both general and Protune for that particular Preset thus saving time.
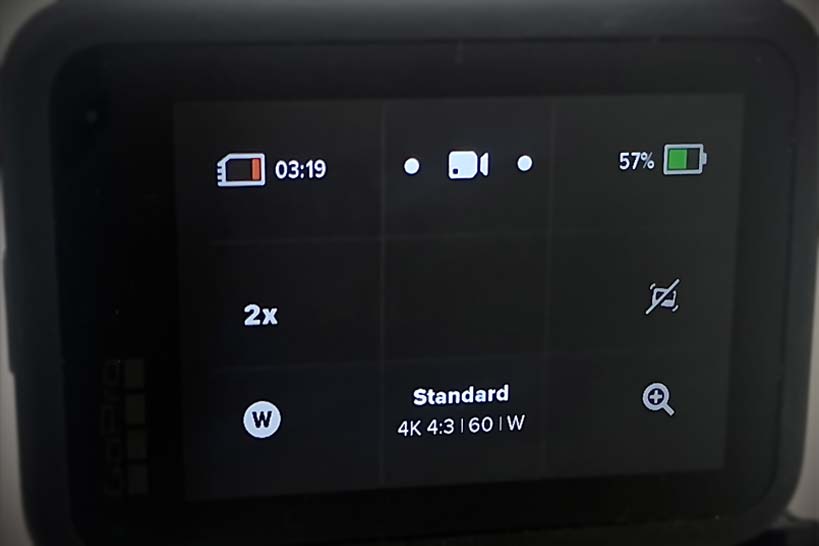
If you look at the picture below you can see 4 icons, one in each corner. The bottom left icon denoted by a W is the shortcut for the camera lens field of view. The magnify glass opposite is the zoom icon.
The 2X icon adjusts the frame rate, which is set to 60 fps in this case, hence the 2X to denote slow-mo.
In the top right shortcut position is the icon for Stabilization. This allows the user to switch between standard and boost with a single tap of the icon.
Lastly, the magnifying glass opens the zoom control in video mode.

How To Edit Shortcuts

Choosing which settings you have available for each of the 4 shortcut locations is relatively easy to edit.
Start by either tapping or holding down for a moment the large pill shaped icon at the bottom of the screen.
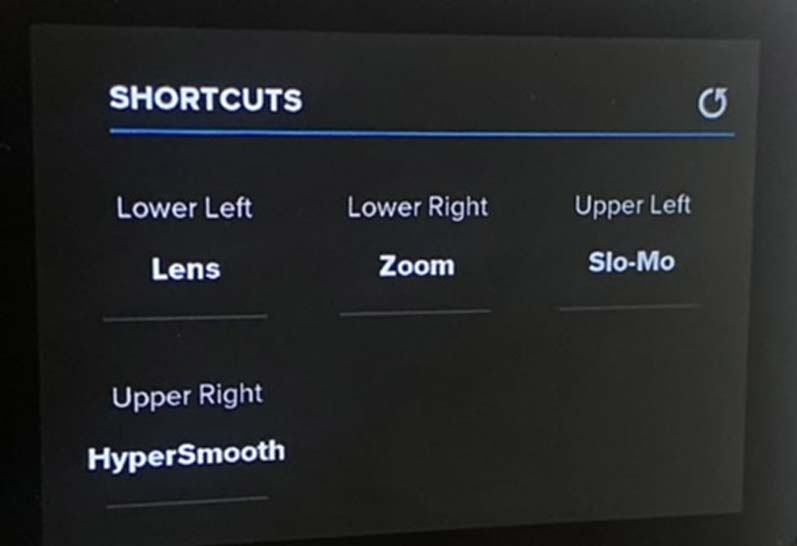
Scroll down the menu until you come to the heading that says Shortcuts (you can see this in one of the pictures in this article.
You are now presented with the 4 corner locations for each icon with their setting attached to each. For example, lower left lens and lower right zoom.
To change the default shortcuts, tap the setting under the corresponding location and up will pop the editing screen.
In the shortcut editing menu screen there is a slider on the right hand side. Simply scroll the slider up or down to find the shortcut you wish to have for that particular location.
Changing A Shortcut
If you follow the directions above on how to edit the 4 shortcuts, you will have all 4 in place on the mode screen ready to capture some footage.
There is also another way to edit a single shortcut though. This is a little known tip that I’ll now share with you.
Top Tip: Press and hold the shortcut icon you wish to edit for a brief moment. The editing screen will now appear along with the slider to change the setting to a different one.
Video Modes
Each of the Modes has different shortcuts available to each of the 4 icon locations. Below I have listed all of the settings available for each.
You will find the default shortcuts listed too at the end of each. To return the shortcuts to the factory defaults. Tap the icon in the top right of the Shortcut main menu screen.
Video Mode Setting Shortcuts
- Off
- Slo-Mo
- Lens
- HyperSmooth
- Scheduled Capture
- Duration
- Hindsight
- Timer
- Zoom
- Bit Rate
- Shutter
- EV Comp
- White Balance
- ISO Min
- ISO Max
- Sharpness
- Color
- RAW Audio
- Wind
- Media Mod
Default: Lens, Zoom, Slo-Mo, HyperSmooth.
Photo Mode Shortcuts
- Off
- Lens
- Output
- Scheduled Capture
- Timer
- Zoom
- Shutter
- EV Comp
- White Balance
- ISO Min
- ISO Max
- Sharpness
- Color
Default: Lens, Zoom, Timer, Output.
Timelapse Mode Shortcuts
- Off
- Lens
- Interval
- Scheduled Capture
- Duration
- Timer
- Zoom
- Bit Rate
- EV Comp
- White Balance
- ISO Max
- Sharpness
- Color
Note: Night Lapse has shutter.
Time Warp Mode Shortcuts
- Off
- Lens
- Speed
- Speed Ramp
- Scheduled Capture
- Duration
- Timer
- Zoom
- EV Comp
- White Balance
- ISO Min
- ISO Max
- Sharpness
- Color
- Wind
Default: Lens, Speed Ramp, Off, Zoom.

