GoPro Hero 10 Settings For Skiing
I spent 3 months skiing in the Alps mountain region with the GoPro Hero 10 last season. Over that time I learnt a lot about the best GoPro Hero 10 settings for skiing, which I’m going to now share with you below.
Protune Settings For Skiing
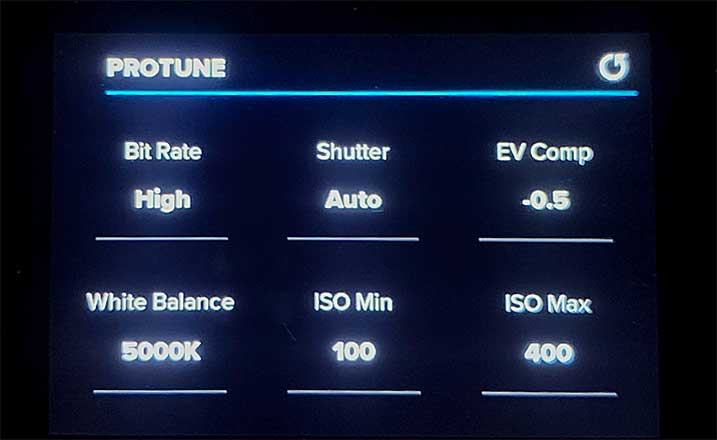
Below are the Hero 10 Protune settings I use for skiing. I’ll go through each setting in more detail under the dedicated heading the reasons why they are set to these parameters.
- Bit Rate: High
- Shutter: Auto
- EV Comp: -0.5
- White Balance: Auto
- ISO Min: 100
- ISO Max: 400
- Sharpness: Medium
- Color: Natural
- Raw Audio: Off
- Wind: On
Bit Rate
All video is compressed using the GoPro camera’s firmware. The bit rate is the level of compression. A high bit rate equates to less compression and better picture quality with less artifacts or noise.
There is a trade off in recording large video files when using the high bit rate setting. So take that into consideration in regards to uploading content to social media, plus micro SD card storage.
Shutter
The lighting conditions vary too greatly when skiing so it’s best to leave the shutter on Auto for that reason. Auto shutter works well the majority of time.
ND Filters
When using an ND filter attached to the lens, you may want to set the shutter to double the frame rate. For example, if you’re shooting at 60 frames per second, set the shutter to 1 over 120 (1/120).
The reason to manually set the shutter with an ND filter is to achieve motion blur which makes for more cinematic footage.
EV Comp
EV Comp stands for exposure compensation. 1 unit of EV equates to 1 lens stop. Setting EV Comp to -0.5 helps reduce “blown highlights” / overexposure.
I’d suggest using -0.5 EV for all the GoPro Hero 10 presets, not just for skiing but filming other content also.
White Balance
White balance is one of the most critical settings to get right inside the camera which is measured in degree Kelvin (K). Snow being white, it tends to show incorrect color temperature far more prominently.
I use Auto white balance occasionally when I know the lighting conditions are not going to change over time while skiing. When the light changes throughout the shot I set the white balance to 5000K.
Iso Setting
The lower the Iso the less noise in the image. Skiing tends to be in bright ambient light due to sunlight reflecting off the snow. The camera therefore requires an Iso no higher than 400.
Sharpness
This comes down to personal preference so I’d suggest taking some test video footage to see which you prefer between the 3 settings from low, medium to high sharpness.
The low setting will require some added sharpening in post production. So if you’re looking to get the optimum quality from your GoPro, it’s worth experimenting if you’re shooting B roll for more professional content creation.
Personally, I leave my Hero 10 on Medium sharpness for sharing footage across social platforms.
Color
Protune has 3 color profile settings to choose from.
- Flat: Neutral color profile
- Natural: True to life color profile
- Vibrant: Color saturated profile
Of the 3 profiles I set my GoPro Hero 10 to the Natural color profile for skiing. If I want to add some color saturation I prefer to do this in the video editing process.
Audio Settings
It’s always worth capturing good ambient quality audio with as little wind noise as possible. I always have the Wind setting set to ON while on the mountain. The exception being if I’m using the GoPro Media Mod with its built-in directional mic.
Wind Noise Reduction
To help with wind noise reduction it is possible to attach several Rycote micro windjammers covering the internal on-body mics. This does improve the audio if you’re going to record spoken words.
Image Orientation
Decide what social platform you are going to share your GoPro footage. For YouTube choose the traditional horizontal orientation.
For Instagram stories and TikTok, rotate the Hero 10 vertically and set the orientation lock to ON.
Aspect Ratio
If you’re shooting for YouTube or playback onto a Smart TV then 16:9 aspect ratio is the best choice to go with.
4:3 Aspect Ratio
The GoPro Hero 10 has a 4:3 aspect ratio image sensor. For the camera to record 16:9 aspect it crops into the sensor top and bottom. Therefore the 4:3 aspect has a wider field of view (FOV) in the vertical.
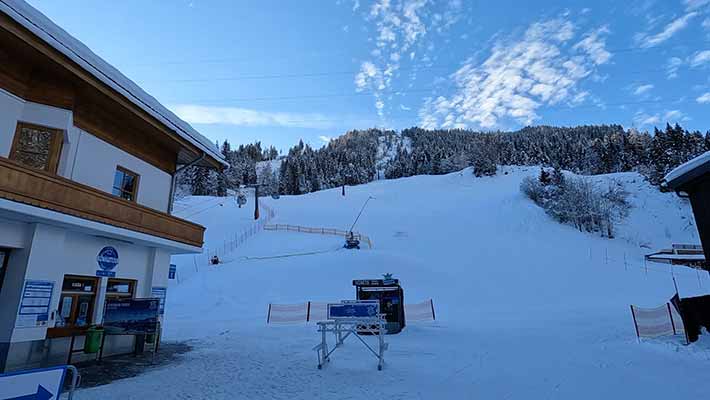
4:3 aspect ratio is a better choice for POV shots mounted on a ski helmet for example. More of the action is included in the frame which always makes for a more dynamic video shot.
Video Resolution
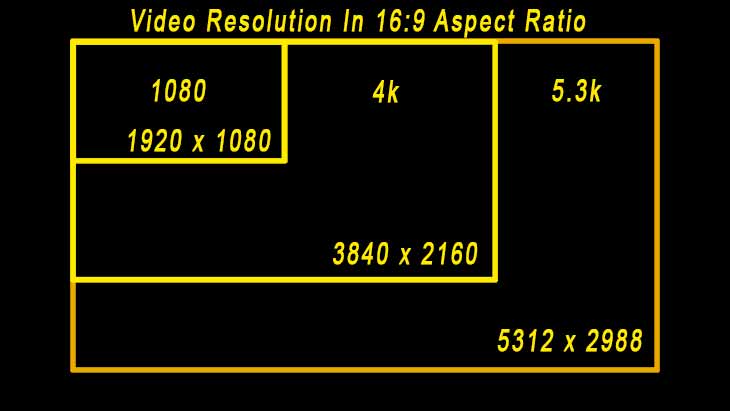
I film most of my ski videos in 4k resolution. 4K has great picture quality, plus a greater choice of frame rates.
If you’re low on SD card storage or looking to upload as small a video file as possible to share on social platforms 1080P is the best resolution to go with.
5.3K Resolution
The 4K resolution looks fantastic on the Hero 10. However the new 5.3K at 60 frames per second (fps) takes creating content with GoPro cameras to another level.
For those of you who are more likely to use the Hero 10 for documentary / skiing style content, 5.3K is definitely worth considering.
Slow Motion
Shooting at 4K 60 fps allows you to slow down the action x2. For even slower motion in 4K there is the 120 fps frame rate setting.
I find 120 fps is plenty slow enough for skiing action. However if you do decide to slow things down even further there is 2.7K at 240 fps albeit at lower quality video.
Lens – FOV
For POV (Point of view) shots Linear + Horizon Leveling is my choice of lens. I also use the Wide Lens on less steep slopes, say, skiing down a trail amongst the trees. The wide lens in this instance captures more scenery moving through the frame.
Stabilization
I find the Standard level works well for most skiing. If you’re skiing bumps you may want to experiment with Boost. Remember the image crop is greater in Boost compared to Standard.
Sharing GoPro Footage
Creating content with a GoPro is all about sharing the footage with friends, family and the wider world. There are a few considerations that have a bearing on what GoPro settings you use for social media.
- Image Quality
- File Size
- Upload Speed
File size does have an impact on upload speed. Recording content with a lower bit rate, plus resolution will mean smaller video clips.
Summary
I’m now going to summarize the settings outlined in this article. I appreciate for those who are new to the GoPro Hero 10 it’s a lot of information to take in. Follow the 7 points below to set your GoPro up for skiing.
- Start by changing the 4k factory preset to the Protune settings provided in this guide.
- Set the frame rate to 60 fps in 4K
- 4:3 aspect ratio only for social media such as Instagram, Vero or TikToK.
- 16:9 aspect ratio for traditional content.
- Lens: Linear + Horizon Leveling.
- Standard Stabilization.
I hope you find this article helps with improving your overall experience with the Hero 10 while on the ski slopes. Drop me a comment if you have any questions. Stay safe on the slopes and enjoy sharing great video content with other skiers.